偙偺儁乕僕偼庯枴偺傾儅僠儏傾柍慄偐傜摼偨抦幆傪揨傔偨傕偺偱偡丅/ This page summarizes the knowledge gained from my hobby of amateur radio.丂
QTH Osaka JAPAN
Zone25-ITU45 Locator PM74tu
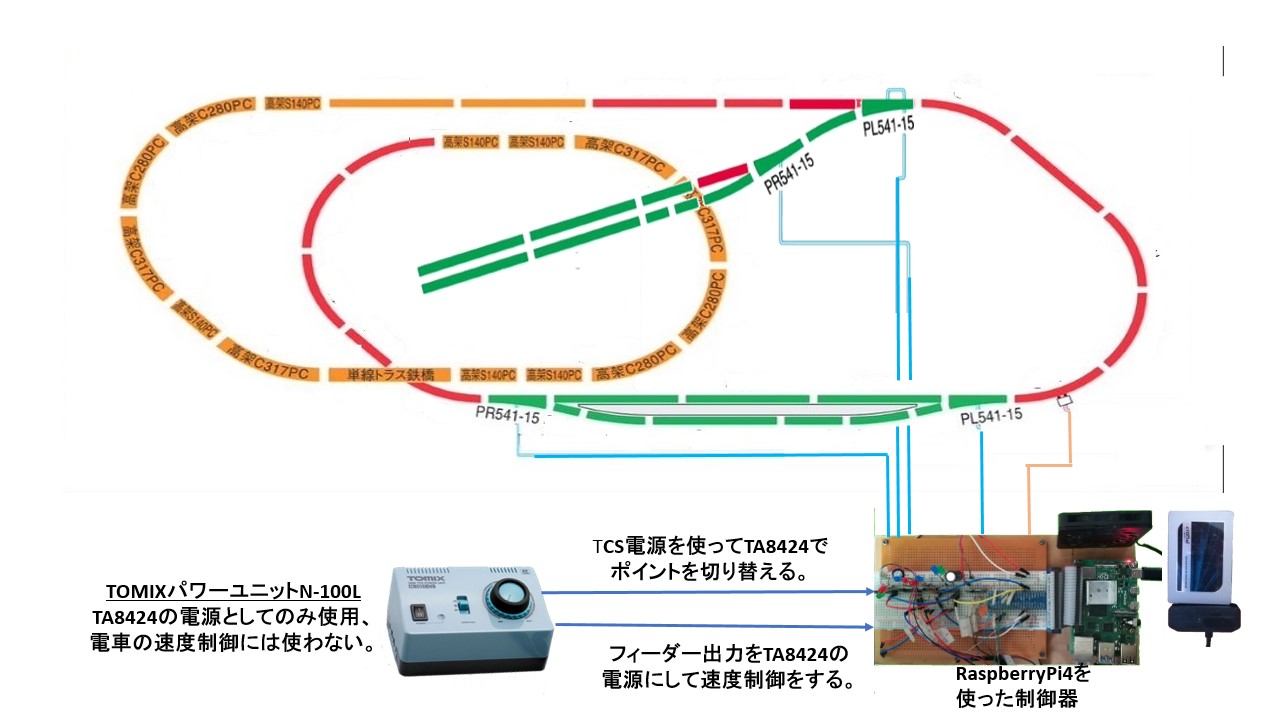
儗僀傾僂僩Layout
攝抲恾 / Rail layout
 丂丂丂丂丂
丂丂丂丂丂TOMIX偺僾儔儞DX-PC(儗乕儖僷僞乕儞A+B+C)偵儗乕儖僷僞乕儞B傪捛壛偟偨儗僀傾僂僩偱偡丅TOMIX偺揹摦億僀儞僩(N-PL541-15-SY偲N-PR541-15-SY)傪惂屼偡傞幵椉埵抲専弌僙儞僒乕(PPR-220)傪S-1乣S-6偺傛偆偵愝抲偟偰偄傑偡丅
This is a layout in which rail pattern B is added to TOMIX's Plan DX-PC (rail pattern A+B+C). Vehicle position detection sensors (PPR-220) that control TOMIX electric points (N-PL541-15-SY and N-PR541-15-SY) are installed as like S-1 to S-6.
FT-991偲摨嫃偟偨嫹偄僔儍僢僋 / Narrow shack with FT-991
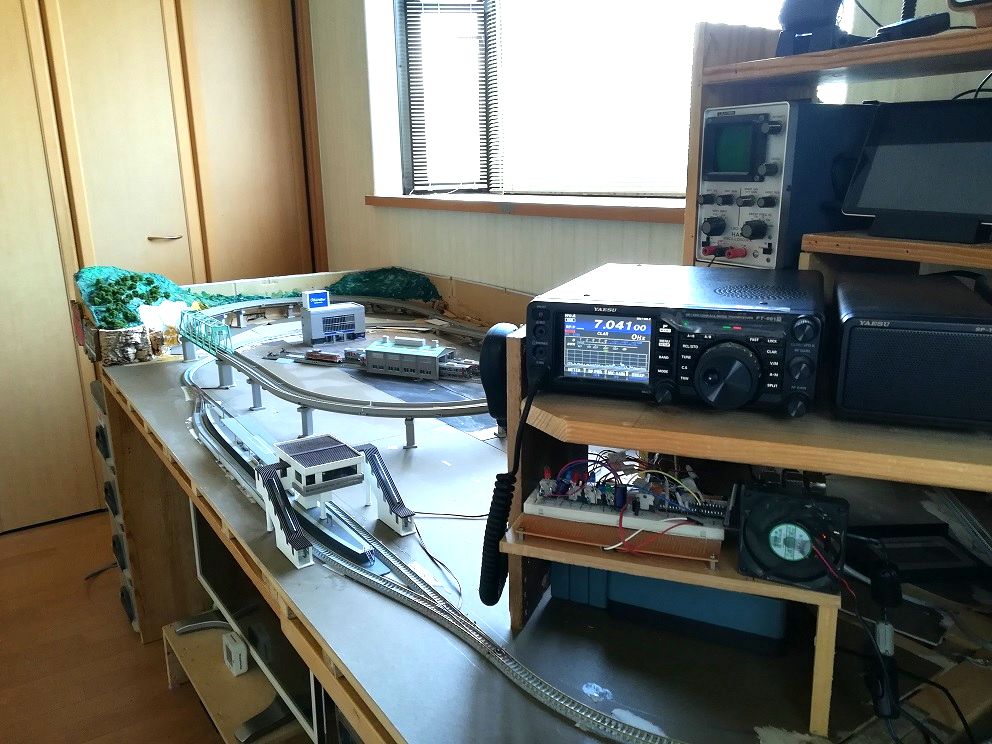
嫹偄僔儍僢僋偵N僎乕僕傪摨嫃偟偰儗僀傾僂僩偟傑偟偨丅FT-991偺壓偵偁傞偺偑N僎乕僕偺僐儞僩儘乕儔乕偱偡丅
I laid out the N gauge together in a narrow shack. Below the FT-991 is the N gauge controller.
弨旛偟偨暔 / Prepared
1.Raspberry Pi ZeroW丄Raspberry Pi3丄Raspberry Pi4
2.儌乕僞乕僪儔僀僶乕TA8428(僀儞僞乕僱僢僩偱僨乕僞乕僔乕僩側偳怓乆偲嶲峫帒椏偑尒偮偐傝傑偡丅乯
3.斀幩宆儂僩僙儞僒乕PPR-220(僀儞僞乕僱僢僩僨乕僞乕僔乕僩側偳怓乆偲嶲峫帒椏偑尒偮偐傝傑偡丅乯
4.FREENOVE偺乽僗僞乕僞乕僉僢僩乿FNK0019乮https://freenove.com/tutorial.html偐傜妛廗帒椏偑僟僂儞儘乕僪偱偒傑偡丅乯
5.TOMIX儅僀僾儔儞X-PC乮TOMIX偺儂乕儉儁乕僕傪嶲徠丅乯
6.TOMOX儗乕儖僷僞乕儞B乮TOMIX偺儂乕儉儁乕僕傪嶲徠丅乯
RaspberryPi偺揹巕岺嶌偼枹宱尡側偺偱僀儞僞乕僱僢僩偺忣曬偐傜FREENOVE偺乽僗僞乕僞乕僉僢僩乿FNK0019傪峸擖偟偨丅 丂丂 https://freenove.com/fnk0019/偐傜妛廗帒椏(僠儏乕僩儕傾儖)傪僟僂儞儘乕僪偟偰丄偼偠傔偰僽儗僢僪儃乕僪側傞傕偺偵LED傪庢傝晅偗偰丄Python偺僾儘僌儔儉偱LED偺揰柵傪懱尡偟偨丅 偦偺屻丄恻梋孅嬋偼偁偭偨偑儌乕僞乕僪儔僀僶乕TA8428偱DC儌乕僞乕偺惓揮丄媡揮丄懍搙惂屼傪偡傞Python僾儘僌儔儉偵扝傝拝偄偨丅 偦偟偰丄TA8420偱TOMIX偺揹摦億僀儞僩偺嬱摦偵傕惉岟偟偰丄偝傜偵幵椉埵抲専弌梡斀幩宆儂僩僙儞僒乕PPR-220偺巊偄曽傕夝偭偨
1.Raspberry Pi ZeroW, Raspberry Pi3 and Raspberry Pi4
2. Motor driver TA8428 (You can find various reference materials such as data sheets on the Internet.)
3. Reflective photosensor PPR-220 (You can find various reference materials such as data sheets on the Internet.)
4. FREENOVE "Starter Kit" FNK0019 (You can download the tutorial PDF from https://freenove.com/tutorial.html.)
5. TOMIX My Plan X-PC (See the TOMIX homepage.)
6.TOMOX rail pattern B (Refer to the TOMIX homepage.)
Since I have no experience with RaspberryPi electronic work, I purchased FREENOVE's "starter kit" FNK0019 from information on the Internet. I downloaded the tutorial PDF from https://freenove.com/fnk0019/, attached an LED to a breadboard for the first time, and experienced the blinking of the LED with a Python program. After that, although there were twists and turns, I arrived at a Python program that controls the forward rotation, reverse rotation, and speed of the DC motor with the motor driver TA8428. I also succeeded in driving TOMIX's electric points with the TA8420, and also learned how to use the PPR-220 reflective photo sensor for vehicle position detection.