このページは趣味のアマチュア無線から得た知識を纏めたものです。/ This page summarizes the knowledge gained from my hobby of amateur radio.
QTH Osaka JAPAN
Zone25-ITU45 Locator PM74tu
ハムパイHamPi
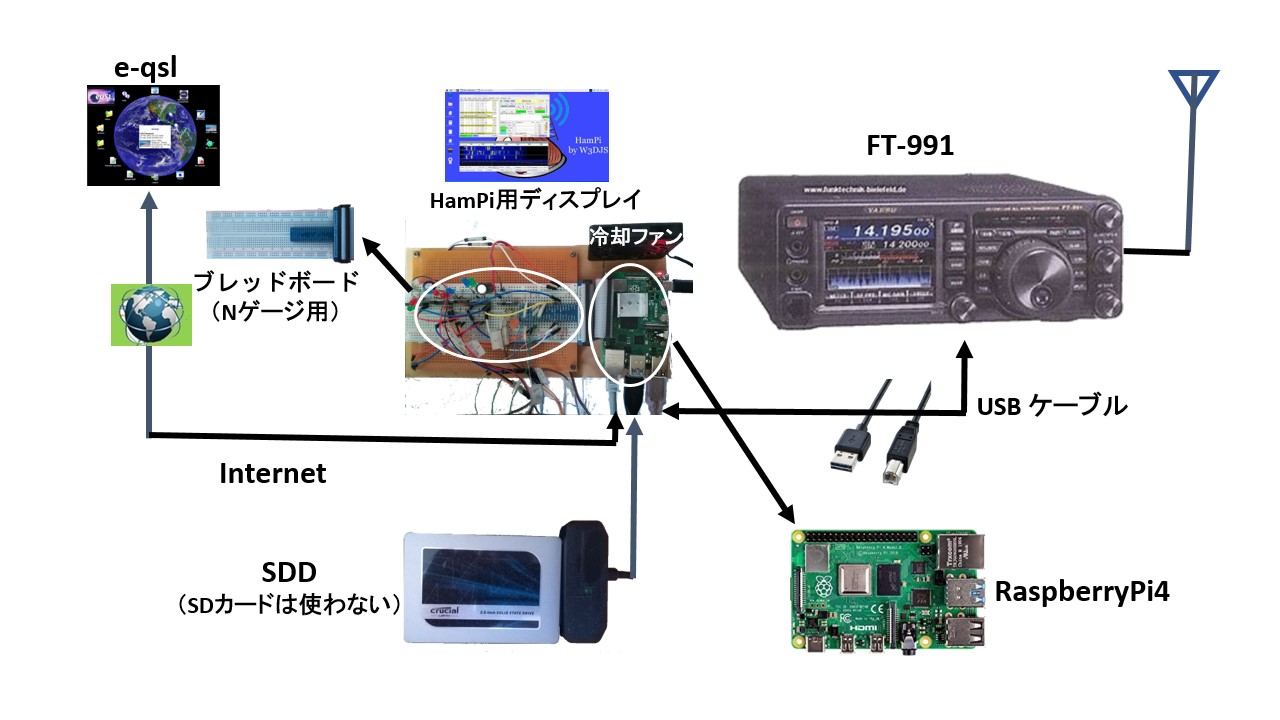
Systematic chart of HamPi / 運用体系図
下の図は見よう見まねでたどり着いた7Mhzと50MhzでTDを気にする事なくFT8が運用できるようになった系統図です。
1.HamPiの中にあるJTDXでFT8を運用しますがFT911とRaspberryPi4をUSBケーブルで繋ぐだけです。
2.HamPiはWindowsパソコンと同じようにJTDXでRaspberryPi4のサウンドカードを認識するようになっています。
3.HamPiの中にあるJTDXでFT8を運用する場合、時間の校正は自動的に行われているようなので受信時のTDを気にする事はありません。
4.HamPiの中にあるFLrigはトランシーバーが制御できますのでFLrigを通してJTDXでFT8の運用も体験しました。
The below below is a system diagram where FT8 can be operated without worrying about TD at 7Mhz and 50Mhz, which I learn by watching others.
1.I will operate FT8 with JTDX in HamPi, but just connect FT911 and RaspberryPi4 with a USB cable.
2.HamPi recognizes the RaspberryPi4 sound card with JTDX just like a Windows computer.
3.When operating FT8 of JTDX in HamPi, time calibration seems to be done automatically, so there is no need to worry about TD when receiving.
4.The FLrig in the HamPi can control the transceiver, so I also experienced the operation of FT8 with JTDX through the FLrig.
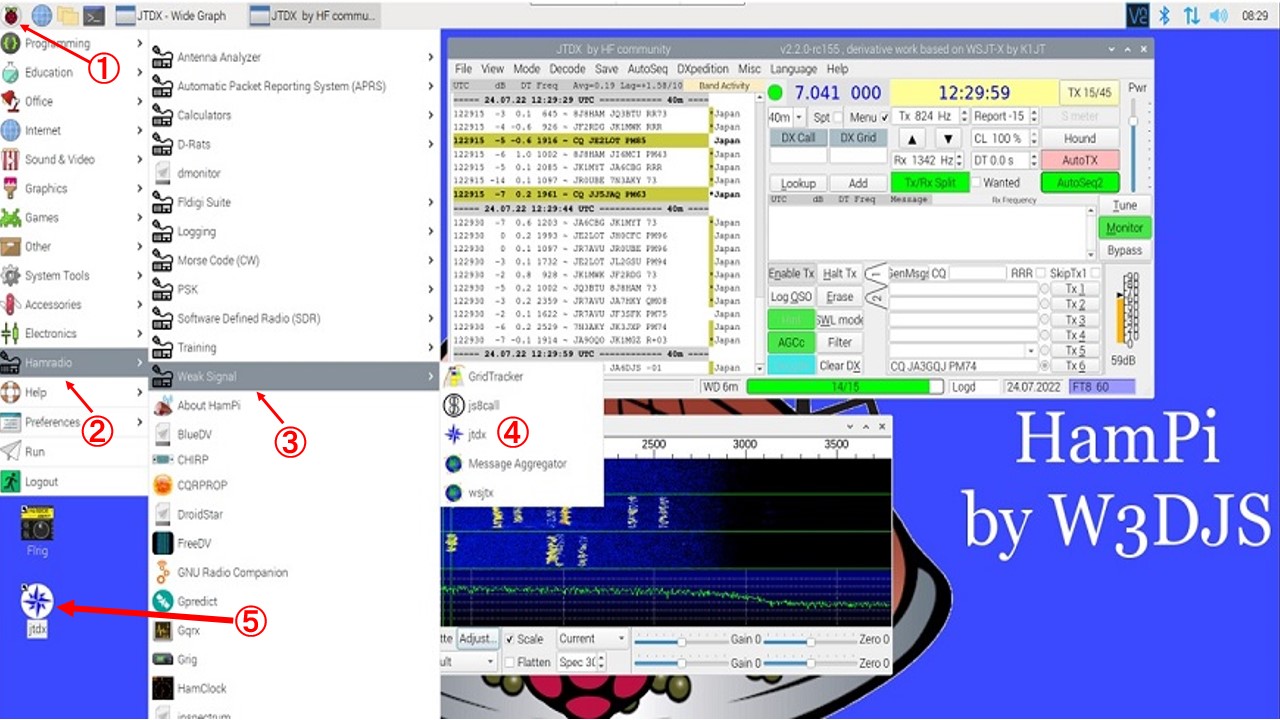
HamPi menu on RaspberryPi4 desktop / RaspberryPi4ディスクトップのHamPiのメニュー
下の図はFT8を運用中ですが、ラズベリーのアイコン①をクリックしてポップアップするメニューの下から5行目に「Hamradio」②と言う項目があります。これをクリックするとサブメニューがポップアップしてインストールされたソフトのリストが表示されます。JTDXは「Weak Signal」③をクリックしてポップアップするリストの中④にありす。尚、これだけをRaspberryPi4のディスクトップにアイコン⑤で表示することも出来ます。トランシーバーが制御できるFLrigは「FLdigi Suite」のリストの中にあります。これもRaspberryPi4のディスクトップにアイコンで表示することが出来ます。 右の図をクリックしたら拡大画像が表示されます。
In the below figure, FT8 is running, then there is an item called "Hamradio" ② on the 5th line from the bottom of the menu that pops up by clicking the raspberry icon ①. Clicking this will pop up a submenu with a list of installed software. JTDX is in ④ in the list that pops up by clicking "Weak Signal" ③. In addition, it is also possible to display only this on the desktop of RaspberryPi4 with icon ⑤. The FLrig that the transceiver can control is in the list of "FLdigi Suite". This can also be displayed as an icon on the desktop of RaspberryPi4. Click on the right image to enlarge it.
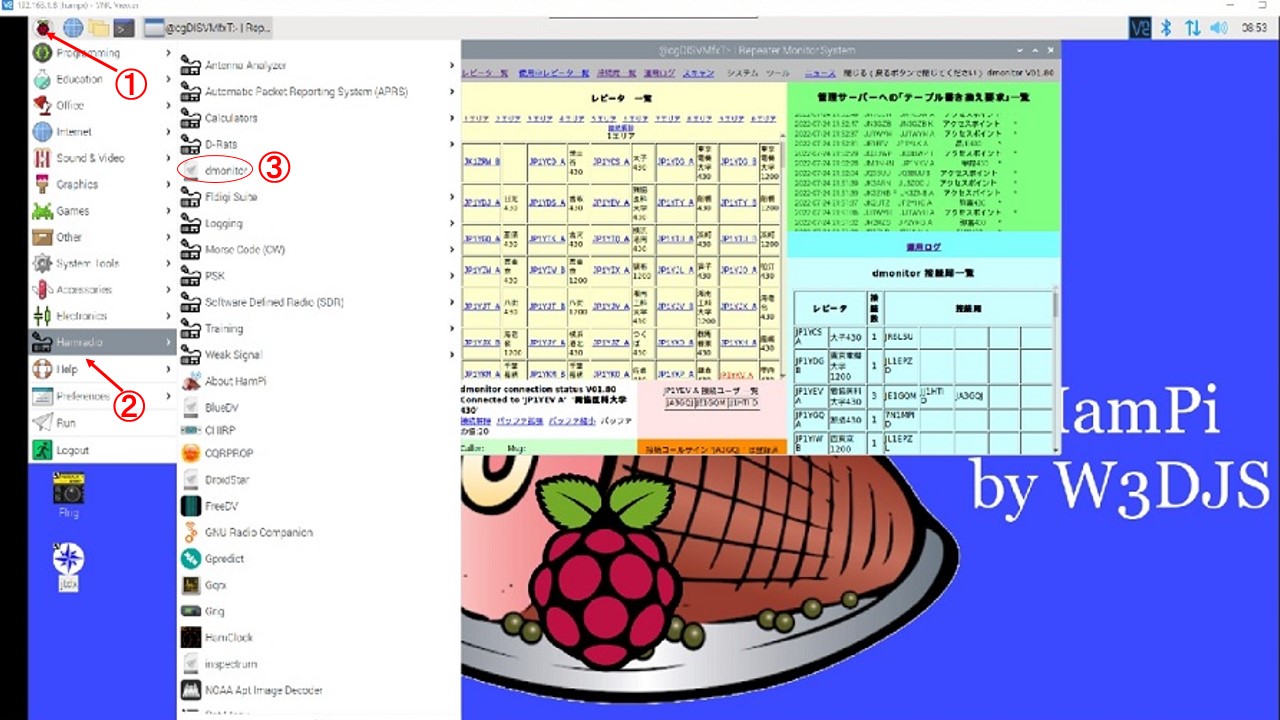
Menu with dmonitor added / dmonitorを追加したメニュー
下の図はdmonitor運用中に開いたメニューのスクリーンショットです。 ラズベリーのアイコン①をクリックして開くメニューの「Hamradio」②の中に「dmoniter」③として追加しています。 左の図をクリックしたら拡大画像が表示されます。
The below left is a screenshot of the menu opened during dmonitor operation. It is adding as "dmoniter" ③ in "Hamradio" ② in the menu that opens by clicking the raspberry icon ①. Click on the left image to enlarge it.
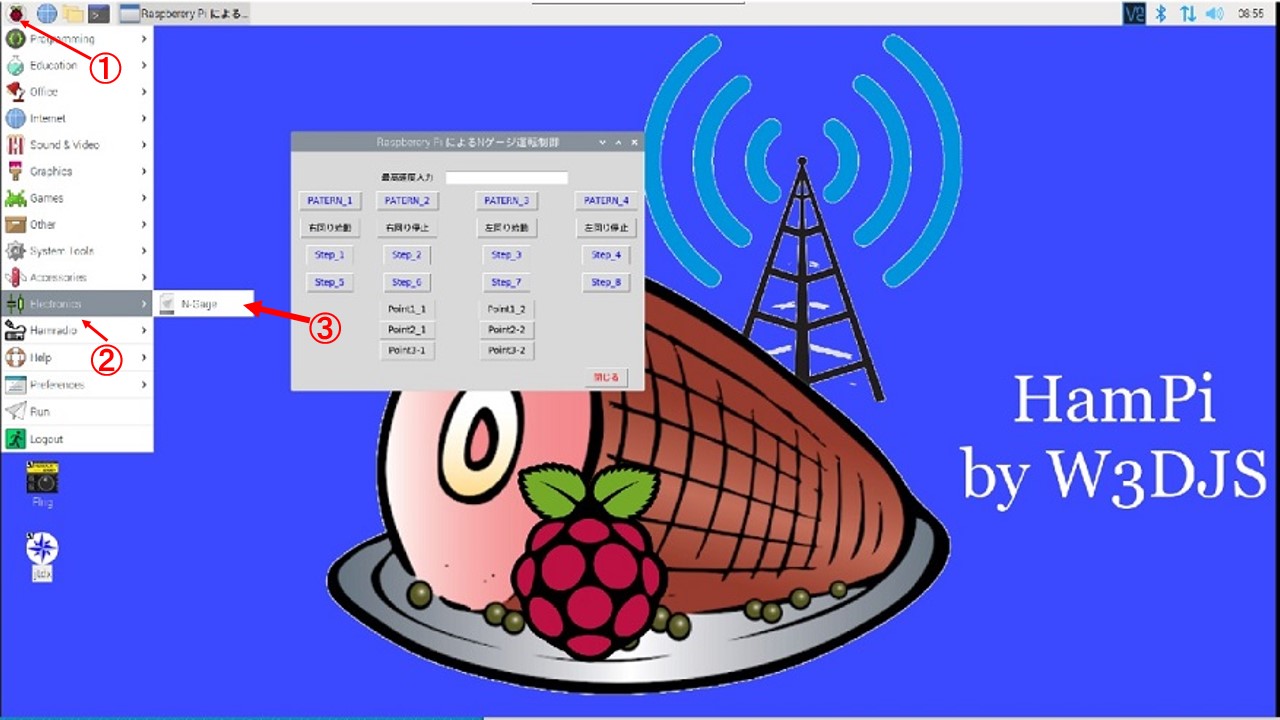
Menu with N-gauge added / Nゲージを追加したメニュー
下の図はdmonitor運用中に開いたメニューのスクリーンショットです。 ラズベリーのアイコン①をクリックして開くメニューの「Hamradio」②の中に「dmoniter」③として追加しています。 左の図をクリックしたら拡大画像が表示されます。
The figure below is a screenshot when the N gauge software is started on HamPi. The software is adding as "N_Gauge" ③ in "Electronics" ② in the menu that opens by clicking the raspberry icon ①. Click on the right image to enlarge it.
HamPiのソフトのダウンロードと参考にした動画
ダウンロード : https://sourceforge.net/projects/hampi/>参考にした動画 :
① HamPi Ham Radio Software for Raspberry Pi from W3DJS (#294) ここをクリック
② How to Install HamPi on Raspberry Pi 4b - HAM Radio - TheSmokinApe ここをクリック
③ HamPi Raspberry Pi Image for Ham Radio ここをクリック
④ Ham Radio - HamPI, possibly the best general ham radio image for the raspberry pi. ここをクリック